Jahazi

Jahazi

Introduction

"If you want to build a ship, don't drum up people to collect wood and don't assign them tasks and work, but rather teach them to long for the endless immensity of the sea"
Antoine de Saint-Exupery

With that in mind one may think that anybody with a passion for the sea can build an ocean going yacht. But be warned! It is not something that can be taken lightly. It takes time and dedication.This project was started in 2004 with the purchase of plans for the Didi 34. Although almost finished, it is still ongoing.

Monday 16 March 2020

Dogger coaming

A coaming, upon which a dogger can later be fitted, was constructed on either side of the companionway opening. Because of the extreme curve, I used bendply to laminate pieces out of which the final shape was planed.  


Tuesday 18 February 2020

Sliding hatch garage and instrument console

The instrument console is not specified on the boat plans. So I had to design my own.


Wednesday 4 December 2019

Roof doublers

The cabin roof needs to be strengthened in areas where there are load bearing deck equipment. This is done by adding doublers on the inside. I used wood supports to keep them in place until the epoxy set.


Wednesday 20 November 2019

Hatch frames

The deck hatches are to be mounted on a flat surface. Therefore I had to make frames with a curved edge on the one side and a flat edge on the other. I made a jig using a long batten with a length similar to the radius of the deck crown to cut the curved sides of the timber with a router. 


Tuesday 22 October 2019

Companionway door and sliding hatch

The boat plans specify a simple Plexiglas sliding hatch. However I decided to go for a more traditional look with a hatch build from marine ply and teak.
 The companionway frame and hatch slides were also made using teak.


Thursday 25 April 2019

Companionway ladder

The boat plans do not include a plan for the construction of the companionway ladder. Since the dimensions for each boat will be different, I had to design my own using ladder design guidelines such as the optimum step depth, distances apart and the angle of the ladder. Using the program "Sketchup" I came up with the following.

My plan with dimensions


How its should look

The end product

Wednesday 17 April 2019

Fiberglass sheathing of the deck

Although the building plans do not specify fiberglass sheathing of the deck, I have decided to do sheathing not realizing the amount of work involved. It will however increase the strength and stiffness of the deck, provide added impact and abrasion resistance and an overall better resistance to wear.
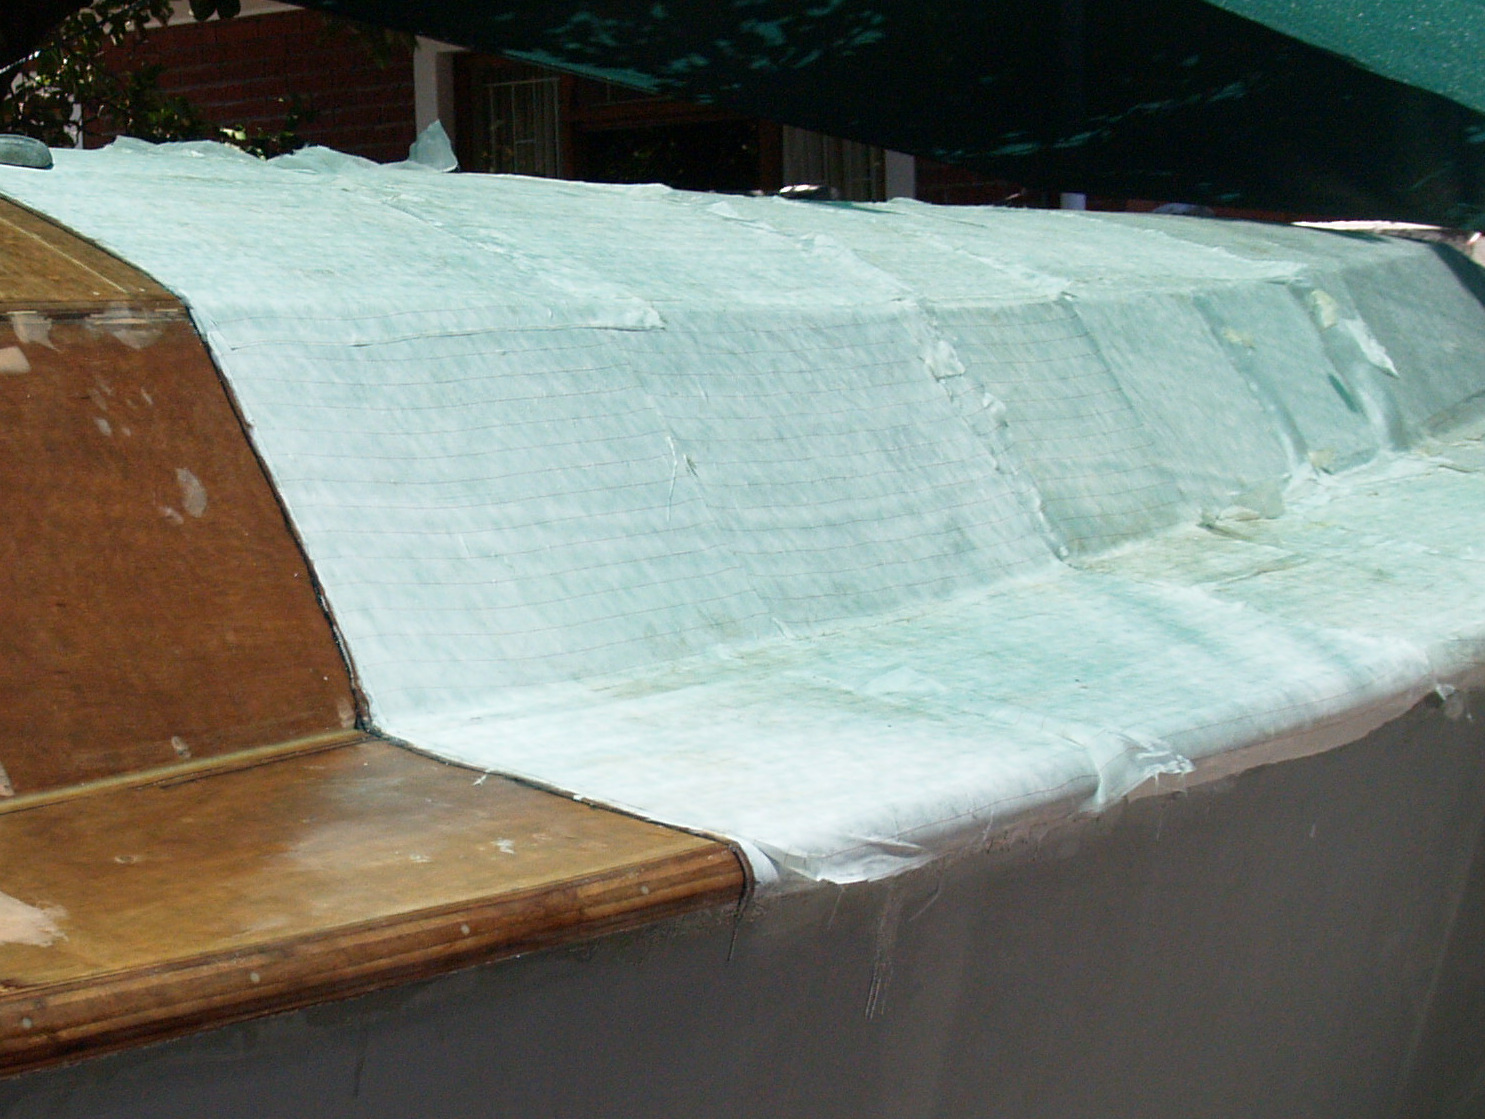
To do the sheathing dry fiberglass cloth was positioned on the surface and epoxy poured directly onto the fabric in small puddles and the epoxy was then worked into the fabric using a plastic squeegee and/or foam roller to remove trapped air. When tacky another layer of white epoxy was applied and Peel Ply applied on the wet epoxy.
The use of Peel Ply in the sheathing process is extremely important.  The closely woven nylon cloth of the Peel Ply is a release fabric to which epoxy will not adhere and is applied as the last layer of the sheathing process. When the Peel Ply is removed at a later stage, the textured surface will need no or only a little sanding thus allowing further layers of glass/epoxy, fairing compounds or coatings to be applied.

The fiberglass is white cloth when dry. 

but becomes transparent when wet-out with the epoxy

The final layer of epoxy is covered with peelply 
The peelply provides a rough surface for bonding of the final layer of paint.


Wednesday 5 December 2018

Cabin and deck fairing

The time has come to prepare the cabin and deck for the epoxy glassfiber sheathing layer I am going to add to all exterior surfaces. This involves the time consuming process of fairing by planing and sanding. Fairing is the process of creating or shaping a smooth line, edge or surface, free of hollows or bumps. Its purpose is to correct any unevenness or flaws in the surface after the structure is completed. Final fairing begins with overall fairing. Removing major high spots and/or filling low spots over broad areas. Then local fairing removes any remaining minor surface irregularities and makes the surface texture smooth to the touch.


Friday 2 November 2018

Cabin top

After spending a month touring Namibia by 4x4, I was back building Jahazi. Next the cabin top had to be done. Before laminating the cabin top, the cabin top beams must be fitted. These were already done in 2017, so I could start straight-away. The cabin top is of 12 mm ply and because of the curvature of the roof must be laminated from 2 layers of 6 mm ply. The easiest way of doing this is by using 500 mm ply strips across the width. When working alone these are more manageable than larger pieces.


Thursday 12 July 2018

Coaming constuction


By end of the end of June I finished both the coamings. I deviated slightly from the design plans. Instead of making the outside sides at an angle of 55 degrees (first picture), I made them to align with the cabin sides at 35 degrees. I do not like the sharp edge at the top of the coamings when the sides are at 55 degrees. It also looks better doing it the more traditional way. Furthermore, it is easier to mount the winches on a flat surface rather than building winch mounts at an angle.

coaming at 55 degrees (not my build)